Overview
The jQuery Taconite Plugin allows you to easily make multiple DOM updates using the results of a single AJAX call. It processes an XML command document that contain instructions for updating the DOM. A command document looks like this:<taconite>
<append select="#status">
Your order has shipped!
</append>
</taconite>
$('#status').append('Your order has shipped');$.get('orderStatus.php');So What?
So far we haven't seen evidence that the Taconite Plugin provides any capabilities beyond what jQuery can do very well on its own. So why use it? The power of Taconite is in its ability to process more than one element in the response document. In fact the command document can have an unlimited number of commands. Consider the following hypothetical: A user submits an order for 1 dozen red roses and in response you would like to make the following page udpates:- Replace the "promotion" div with a "Thank you" message
- Remove the "emptyMsg" row from the shopping cart and remove any elements with the class "preOrder"
- Add a row to the shopping cart with the quantity, descption and amount of the order
- Update the "cartTotal" element with the new shopping cart total
<taconite>
    <replace select="#promotion">
        <div>Thank you for your order!</div>
    </replace>

    <remove select="#emptyMsg, .preOrder" />

    <append select="#cartTable tbody">
        <tr><td>1</td><td>Dozen Red Roses</td><td>$18.99</td></tr>
    </append>

    <replaceContent select="#cartTotal">
        $18.99
    </replaceContent>
</taconite>
More Benefits
Write Content in Markup In addition to being able to effect multiple DOM updates at once, the Taconite Plugin allows you to describe the updates in XHTML. This means you can write content the way it was meant to be written - in markup! For example, consider the case of querying the server for the next 10 rows of a dataset. The query might look like this:$.get('results.php?page=2');<taconite>
<replaceContent select="#results tbody">
<!--
This is all just regular markup. Everything in here will replace
the current contents of the tbody element in the #results table.
-->
<tr><td>Item 11 Name</td><td>Item 11 description</td></tr>
<tr><td>Item 12 Name</td><td>Item 12 description</td></tr>
<tr><td>Item 13 Name</td><td>Item 13 description</td></tr>
<tr><td>Item 14 Name</td><td>Item 14 description</td></tr>
<tr><td>Item 15 Name</td><td>Item 15 description</td></tr>
<tr><td>Item 16 Name</td><td>Item 16 description</td></tr>
<tr><td>Item 17 Name</td><td>Item 17 description</td></tr>
<tr><td>Item 18 Name</td><td>Item 18 description</td></tr>
<tr><td>Item 19 Name</td><td>Item 19 description</td></tr>
<tr><td>Item 20 Name</td><td>Item 20 description</td></tr>
</replaceContent>
</taconite>
innerHTML DOM property
to update elements. This means you are free to update the contents of any element -
including tables!
Why not JSON?
Why indeed! JSON is a great data exchange format. But it's not the best solution for every problem. I've found that JSON is not ideal for working with complex data structures. It can work, but it requires careful coding on both the client and server tiers. In comparison, the Taconite model only requires that the server return valid XHTML. There is no coding required on the client at all!Taconite Commands
The list of commands available to Taconite essentially maps directly to the jQuery API. "commands" are the names of jQuery methods and these are broken out into 2 distinct categories based on the type of arguments that the method expects.- Element Commands
- Commands that fall into this category are jQuery methods to which you pass DOM elements.
For example,
append,prepend,before,after,wrap, etc. Taconite processes element commands by passing the entire contents of the command node to the specified jQuery method (as an array of DOM elements). Theselectattribute identifieds the target of the operation and can be any valid jQuery selector. In the example below, the entire contents of the "append" command element will be appended to the DOM element with the id of "main". This includes the text node, the div, and the paragraph.
As a convenience, the Taconite Plugin provides two additional methods in this category that are not found on the jQuery API. They are<taconite> <append select="#main"> This text will be appended to the element with the id of main. <div>So will this!</div> <p>Me too!</p> </append> </taconite>replaceandreplaceContent. - Non-Element Commands
- Commands that fall into this category are jQuery methods to which you pass string arguments
(or no arguments). For example,
addClass,removeClass,attr,css,hide, etc. Taconite invokes these commands using attributes on the command element as the arguments to the command. Thenameandvalueattributes identify the arguments to pass. As of Taconite version 2.0.9, attributes can be named sequentially using argX notation,arg1,arg2,arg3, etc. The following example shows how to write commands for jQuery methods that take zero or more arguements.<taconite> <!-- no-arg commands --> <remove select="#advertisement" /> <hide select="#hideMe" /> <!-- one-arg command --> <addClass select="#changeMe" arg1="special" /> <addClass select="#changeMe" value="special" /> <!-- two-arg command --> <attr select="#updateMe" arg1="title" arg2="My Title" /> <attr select="#updateMe" name="title" value="My Title" /> </taconite> - One Special Command:
eval -
Finally, Taconite provides one special command for processing JavaScript. Within the eval
command you can place any valid JavaScript and it will be evaluated in the global context.
Example:
Note: The JavaScript should be inside a CDATA block if it contains special characters like<taconite> <eval> $('#myTarget').html("This text came from an eval command!"); </eval> </taconite><or&.<taconite> <eval> <![CDATA[ $('#statusBar').html("<strong>An error has occurred!</strong>"); ]]> </eval> </taconite>
Examples
Structure
This example shows how you can easily manipulate the structure of the DOM. The markup is as follows:<div id="example1" style="background-color: #ffa; padding:10px; border:1px solid #ccc">
This is the <span style="color:#800">structure example</span> div.
</div>$.get('example1.php');<?php header('Content-type: text/xml'); ?>
<taconite>
<after select="#example1">
This text will go AFTER the example div.
</after>
<before select="#example1">
<div>This div will go BEFORE the example div.</div>
</before>
<wrap select="#example1 span">
<span style="border: 1px dashed #00F"></span>
</wrap>
<append select="#example1">
<div>This div is APPENDED</div>
</append>
</taconite>
This is the structure example div.
Tables
This example shows how easy it is to manipulate a table with Taconite. The markup is as follows:<table id="example2" style="background-color: #ffa; padding:10px; border:1px solid #ccc">
<thead>
<tr><td>one</td><td>two</td></tr>
</thead>
<tbody>
<tr><td>A</td><td>B</td></tr>
<tr><td>C</td><td>D</td></tr>
</tbody>
</table>$.ajax( { url: 'example2.xml' } );<taconite>
<append select="#example2">
<tfoot>
<tr><td>Foot-1</td><td>Foot-2</td></tr>
</tfoot>
</append>
<replace select="#example2 thead">
<thead>
<tr><td>Head-1</td><td>Head-2</td></tr>
</thead>
</replace>
<prepend select="#example2 tbody">
<tr><td>Body-First</td><td>Body-First</td></tr>
</prepend>
<before select="#example2 tfoot">
<tr><td>Body-Last</td><td>body-Last</td></tr>
</before>
<append select="#example2 tbody">
<tr><td colspan="2" align="center">spanned column</td></tr>
</append>
</taconite>| one | two |
| A | B |
| C | D |
Styling
This example shows how you can use Taconite to change the presentation of the markup. The markup is as follows:<div id="example3" style="background-color: #ffa; padding:10px; border:1px solid #ccc">
<div>div one</div>
<div><span>div two</span></div>
<div>div three</div>
</div>$.get('example3.xml');<taconite>
<css select="#example3" name="backgroundColor" value="#80ff80" />
<!-- the "special" class defines a foreground color of red and font-size of 150% -->
<addClass select="#example3 div span" value="special" />
</taconite>div one
div two
div three
Effects
This example shows how you can use jQuery effects with Taconite. The markup is as follows:<div id="example4" style="display:none; background-color: #ffa; padding:10px; border:1px solid #ccc">
Initially this div is hidden.
</div>$.post('example4.php', {});<?php header('Content-type: text/xml'); ?>
<taconite>
<replaceContent select="#example4">
<pre>
lorem ipsum dolor sit amet
consectetuer adipiscing elit
</pre>
</replaceContent>
<slideDown select="#example4" value="100" />
</taconite>Eval
This example shows how you can return JavaScript in your command document. The markup is as follows:<div id="example5" style="background-color: #ffa; padding:10px; border:1px solid #ccc">
Initial content.
</div>$.get('example5.xml');<taconite>
<eval><![CDATA[
$('#example5').html("<strong>This is new content!</strong>");
alert("Content udpated.");
]]>
</eval>
</taconite>
Initial content.
Demo 1
This page demonstrates many updates at once.| Test | Description | Target | ||||||
|---|---|---|---|---|---|---|---|---|
remove |
Content to the right will be removed |
This div will be removed
This one too
|
||||||
append |
Content to the right will be appended to |
This is the APPEND div |
||||||
prepend |
Content to the right will be prepended to |
This is the PREPEND div |
||||||
after |
Content to the right will have new contents placed after it |
This is the AFTER div |
||||||
before |
Content to the right will have new contents placed before it |
This is the BEFORE div |
||||||
replace |
Content to the right will be completely replaced
(note that the target div has a solid green border) |
This is the REPLACE div |
||||||
replaceContent |
Content to the right will have its contents replaced
(note that the target div has a solid green border) |
This is the REPLACE-CONTENTS div
(contents
contents
contents)
|
||||||
attr |
Content to the right will have its 'class' attribute changed |
This text should turn green |
||||||
| Table Row insertion | Table to the right will have a new row inserted between rows one and two |
|
||||||
wrap |
Text to the right should be wrapped in two bordered divs |
Wrap me in bordered divs |
||||||
<script> |
The button to the right will get a click handler via a dynamically added script element
|
|||||||
hide |
Content to the right will be hidden |
HIDE ME |
||||||
eval |
Evaluating the contents of this command should insert text to the right |
Demo 2 - Strings Instead of Documents
Demo 2 is exactly the same as Demo 1, with one key difference: Demo 2 processes an XML String returned from the server instead of an XML Document. Processing XML strings can not be done using Taconite's auto-detection logic. To process an XML string response from the server you must invoke thetaconite method
manually and pass it the string.
NOTE: The preferred way of using Taconite is with XML Documents! However, if you are unable to
use XML mime types for some reason, well-formed XML in string format is supported.
The following code is used to request and process example7.txt:
$.get('example7.txt', function(responseText) {
    // call Taconite manually, passing it the server response
    $.taconite(responseText);
});| Test | Description | Target | ||||||
|---|---|---|---|---|---|---|---|---|
remove |
Content to the right will be removed |
This div will be removed
This one too
|
||||||
append |
Content to the right will be appended to |
This is the APPEND div |
||||||
prepend |
Content to the right will be prepended to |
This is the PREPEND div |
||||||
after |
Content to the right will have new contents placed after it |
This is the AFTER div |
||||||
before |
Content to the right will have new contents placed before it |
This is the BEFORE div |
||||||
replace |
Content to the right will be completely replaced
(note that the target div has a solid green border) |
This is the REPLACE div |
||||||
replaceContent |
Content to the right will have its contents replaced
(note that the target div has a solid green border) |
This is the REPLACE-CONTENTS div
(contents
contents
contents)
|
||||||
attr |
Content to the right will have its 'class' attribute changed |
This text should turn green |
||||||
| Table Row insertion | Table to the right will have a new row inserted between rows one and two |
|
||||||
wrap |
Text to the right should be wrapped in two bordered divs |
Wrap me in bordered divs |
||||||
<script> |
The button to the right will get a click handler via a dynamically added script element
|
|||||||
hide |
Content to the right will be hidden |
HIDE ME |
||||||
eval |
Evaluating the contents of this command should insert text to the right |
Performance Test
This example loads a 10 column, 500 row table into the space below. Processing this table will result in the creation of over 5500 new elements.
Table will be loaded here.
Extending Taconite
Extending the Taconite Plugin is a fairly simple exercise. By design, Taconite can call any jQuery plugin so extending its capabilities is simply a matter of writing a new plugin. In fact, Taconite uses this architecture to providereplace and
replaceContent commands which are not found on the jQuery API.
First, create a jQuery plugin. For details on writing jQuery
plugins, consult the Plugin Authoring Guide.
Here we'll create a simple plugin that replaces the content of an element and slowly fades in
the new content.
$.fn.replaceAndFadeIn = function(newContentElements) {
    return this.each(function() {
        // for each matching element, remove the current contents, hide the element,
        // append the new contents and then fadeIn the element
        $(this).empty().hide().append(newContentElements).fadeIn('slow');
    });
};
You can now use your plugin as a Taconite command!
<taconite>
    <replaceAndFadeIn select="#extendExample">
        <h2>This is new content added by the <em>replaceAndFadeIn</em> plugin!</h2>
    </replaceAndFadeIn>
<taconite/>
Try It
Test out this new plugin. Click the button below to replace the content in this
div. The new contents will be faded in slowly.
Debugging Taconite
- Serving XML
-
The most important thing to remember when working with Taconite is that the server response must
have an XML content-type. This is critical for
the browser to interpret the response as XML data. You control the content-type of the response
using response headers. The following code shows how to set the response headers for a few server-side languages.
PHP:
JSP:<?php header('Content-type: text/xml'); ?>
CF:<%@page contentType="text/xml"%>
ASP:<cfheader name="Content-Type" value="text/xml">
eXist:<%response.ContentType="text/xml"%>declare option exist:serialize "media-type=text/xml"; - Well-Formed XML
-
Even if you set the response header's content-type to XML, the browser's
XMLHttpRequest object will not be able to build an XML document if the XML is not
well-formed.
This is why XHTML is required and why using self-closing HTML tags is not allowed. If you're not
used to writing XHTML markup, just keep a few things in mind:
- Do not use self-closing tags. For example:
- Instead of
<p>, use<p> ... </p>, or<p /> - Instead of
<br>, use<br /> - Instead of
<hr>, use<hr />
- Instead of
- Use character entities for special characters in text. For example:
- Instead of
&, use& - Instead of
<, use< - Instead of
>, use>
- Instead of
- Enclose content that needs to use special characters in a CDATA block. For example:
<![CDATA[
    // on the following line the "less than" character is needed
    for (var i=0; i < max; i++) {
        // do something interesting
    }
]]>
- Do not use self-closing tags. For example:
- Debug Logging
-
To assist in debugging the Taconite Plugin provides debug logging capabilities that can be
enabled on-demand. When Taconite's debug logging is enabled it will write output
to the Firebug console.
Debug logging is enabled by setting
$.taconite.debugto true. For example:
I highly recommend enabling debug logging during development. The image below shows the type of data that is logged to Firebug.<script type="text/javascript"> $.taconite.debug = true; </script>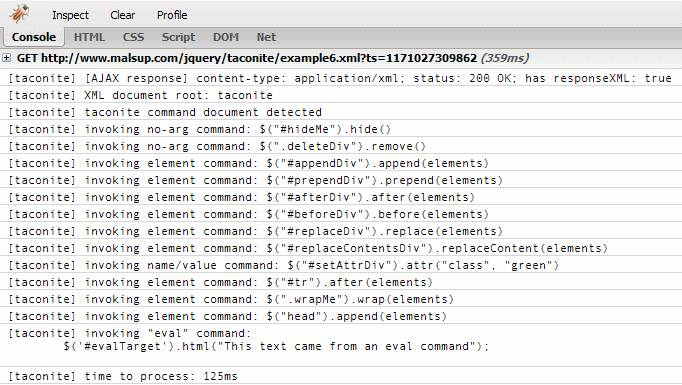
Frequently Asked Questions
- Where did the Taconite Plugin idea come from?
- The idea came from the Taconite Framework which was written by Ryan Asleson and Nathaniel T. Schutta. The Taconite Plugin is essentially a port of that project's parser functionality. Additionally, several ideas were contributed by Kenton Simpson.
- What versions of jQuery is the Taconite Plugin compatible with?
- The Taconite Plugin is compatible with jQuery v1.2.3 and later.
- Does the Taconite Plugin have any dependencies on other plugins?
- No.
- Can I use the Taconite Plugin with the Form Plugin?
- Absolutely! The Taconite Plugin intercepts all server responses so it can be used with any code that invokes $.ajax, either directly or indirectly.
- Is the Taconite Plugin fast?
- Decide for yourself. Run each of the examples on the Examples tab and guage the responsiveness. The Performance example lets you run a stress test that triggers the addition of over 5500 DOM elements (a rather extreme scenario).
- Are the Taconite commands executed in sequence?
- Yes. If you have order-dependent commands you can count on them being executed in the order that they appear in the document.
- Can't I use Taconite with an XML string instead of an XML document?
- Yes, you can, but auto-detection of the command document is not supported for XML strings. See 'Demo 2' on the Examples page for more info.
- Is there a unit test suite for the Taconite Plugin?
- Yes! Run unit tests.
- Are there any server-side libraries that work with Taconite?
- Yes!
- PHP: Taco PHP Class by Donn Hill at http://findmeonthe.net/TACONITE/
- C#: sharptaconite by Goran Siska at http://code.google.com/p/sharptaconite/